Pixel Art Step by Step, Example One

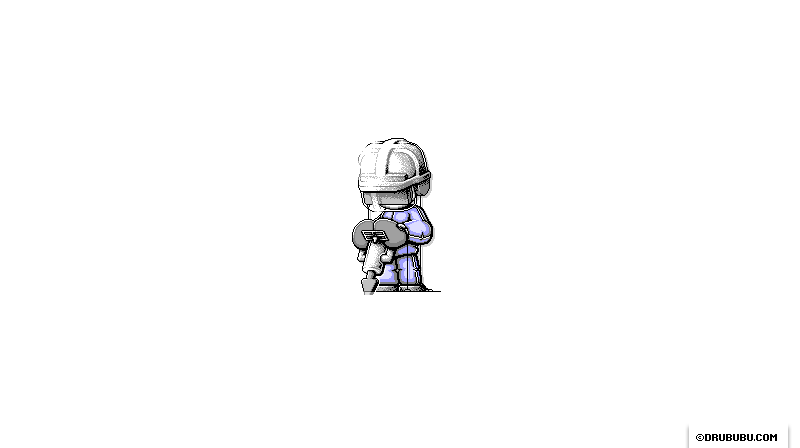
I decided to create a small pixel art illustration of my nameless
puppet.
This time I wanted to make a road worker with a drill, as a sort of logo
for the project.
I relied heavily on the attributes and the pose of the puppet, because
facial recognition is limited.
I came up with a drill, a road sign (that I didn't use), and a
helmet.
In this example, you'll find the creation process from start to finish.
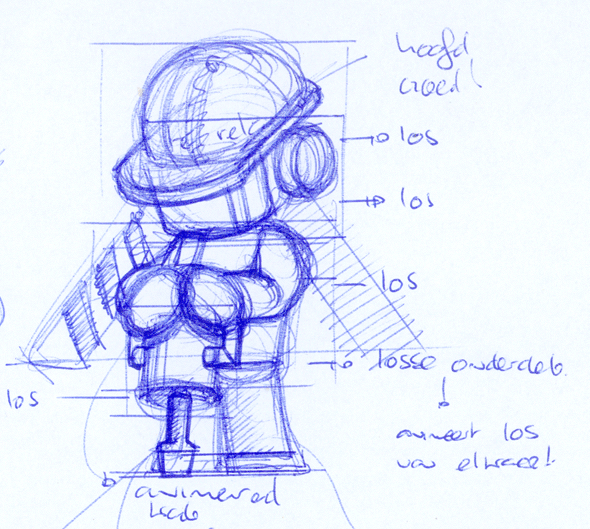
Sketch
Once the idea was clear, I started to sketch.
The sketch was done quite fast, which, most of the time, is a good
indication that a happy result is on the way.

As soon as the sketch is to your satisfaction, the conversion to pixel
art can start.
If you sketch on paper by hand, the sketch needs to be scanned. This can
easily be done in Adobe Photoshop. Adobe Photoshop has some nice
features for adjusting contrast and size.
Once the sketch is the
right size, it can be copied to MS Paint.
Pixelation

Usually I keep an untouched version of the sketch as a reference image
(see image 1); then I start to trace the outline of the sketch (see image 2) with a red
color, in order to visually separate the outline from the sketch.
After the outline is done, I remove the gray pixels so that the outline
becomes clear (see image 3). The outline is the outline of the sketch. During the
process, you will see this outline being fine-tuned.
Once the outline is isolated, I focus on the head and helmet (see image 4). The
next step is the removal of the red color of the outline, and some extra
adjustments to the head and helmet (see image 5).
You can change the color of every individual pixel by hand in MS Paint or Adobe Photoshop; select the red color from the active color palette, then, in the Select menu, choose Similar, and fill the selection with either CTRL + DELETE for background color, or ALT + DELETE for foreground color. Once the red pixels are black, copy and paste the selection back to MS Paint.

The head and helmet are adjusted, and the drill is drawn in more detail (see image 6).
The elbow on the right is adjusted to give the puppet a little bit more
of an active appearance (see image 7). In the previous image the elbow is closer
to the body, which is slightly less powerful than the new position.
The drill is moved from the body, so the puppet can lean more forward -
a more stable position - to keep the drill in place. The outline of the
previous image is quite good, so areas of color can be added as well.
The right side of the helmet now gets a more detailed shading (see image 8).
The right hand of the puppet - left on the image - gets some extra
detail. There's an imaginary light on the left topside of the puppet.
The light causes a highlight on both gloves, and adds shadow underneath
the arm. The left topside of the helmet is adjusted as well. The outline
is slightly less obvious, due to the reflection of the imaginary light
(... you need some imagination for these kinds of details).
By using an imaginary light, some parts are lit, and other parts cast a
shadow. The overall benefit from an imaginary light is contrast, which
in general makes an pixel art illustration more vivid and spatial, or less flat.
Again the helmet is adjusted. The left side becomes slightly bigger; the contrast on the right side is increased. The arm on the right is drawn in more detail (see image 10).

Again the helmet is changed. The curve of the helmet is changed so that
the virtual reality goggles match exactly to the helmet (see image 11).
The drill and the lower body get some extra details
(see image 12). A highlight is added to the safety glass of the
helmet, and more details are drawn in the area around the arm (see image 13).
The next step is to add some extra details to the upper body and drill
(see image 14). The contrast on the left side of the helmet is
changed slightly, and the shadow on the front of the virtual reality
helmet is dithered. Dithering is used to make the transition between
shadow and non-shadow less obvious.
Dithering is explained in more detail in the 'Dithering' chapter.
The contrast of the right side of the helmet is increased, by removing the light grey color next to the black outline (see image 15).

The pixel art illustration looks quite good at this moment, and now it's
time for some extra fine-tuning.
The wires of the virtual reality goggles and the data gloves are added
(see image 16). The highlight on the safety glass is back again,
and the drill gets a little bit more contrast (see image 17).
The drill is slightly changed, and shadow is added. The shadow is mainly
visible on the right side of the pixel art illustration, and separates the pixel
art illustration from the background.
Shadow
The pixel art illustration is made almost completely in MS Paint, except for the
shadow.
To create the shadow, the overall shape of the pixel art illustration is used. The
shape is filled with gray and moved two pixels to the right and two
pixels to the bottom with respect to the original pixel art illustration. The
horizontal shadow at the bottom is removed.
The shadow is created in Adobe Photoshop because drawing by hand in MS
Paint takes much more time.

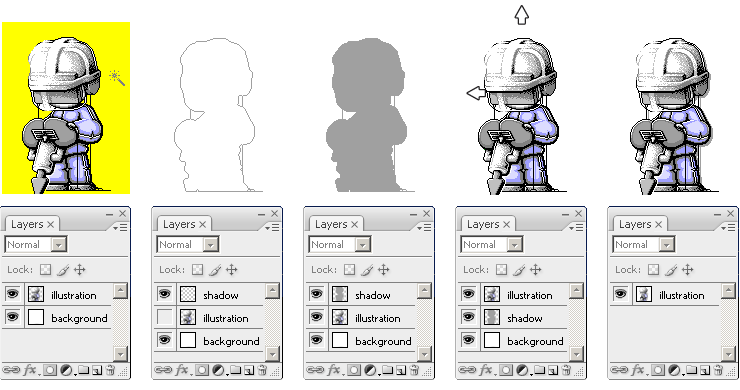
First the pixel art illustration is copied from MS Paint and then pasted into Adobe Photoshop (see image 1).
The shape of the pixel art illustration needs to be selected, so the background is
drawn yellow in MS Paint to separate the background from the
pixel art illustration.
The 'Magic Wand Tool' in Adobe Photoshop is used to select the
background. The tolerance should be zero; 'Anti-alias' and 'Contiguous'
should be deactivated to select the yellow color alone.

The parts of the pixel art illustration, which we don't need for the creation of
the shadow, are selected.
By inverting the selection with 'Select' > 'Inverse' (SHIFT + CONTROL
+I), the pixel art illustration itself is selected.
This selection is cut (CTRL + X) from the background and copied (CTRL +
V) in a new layer 'illustration'. The background and the pixel art illustration
are separated (see image 1).
A new layer 'shadow' is added in the layers popup. The layer
'illustration' is selected again. The shortcut CTRL + A is used to
select the pixel art illustration. The 'Move Tool' is selected in the toolbox, and
Arrow Up is pressed followed by Arrow Down; the pixel art illustration is selected
(see image 2). This selection needs to be filled with the shadow color.
First the layer 'shadow' is selected in the Layers popup. Then, to fill
the current selection, choose 'Edit' > 'Fill' (SHIFT F5) in the menu or
- much faster - press ALT + DELETE (foreground color) or CTRL + DELETE
(background color) (see image 3).
The layers 'shadow' and 'illustration' have to change position. The
layer 'illustration' is moved two positions two the left (use the left
arrow key) and two positions upwards (use the arrow up key) (see image 4).
The shadow at the bottom of the pixel art illustration is removed, and all layers are merged (see image 5).
The pixel art illustration is finished!
